 |
|
Deploy any Dockerized application using AWS
Author: Emad Zaamout
Tuesday, June 27 2023
Deploy any Dockerized application using AWS RDS, ECR, ECS, Load Balancers, ECS Cluster, Task Definitions, Target Groups, Route53, AWS ACM, IAM, GitHub, etc "
Github Repository https://github.com/emad-zaamout/laravel-docker-aws-deployment-course-start
1:50 Laravel Project Setup
5:19 Docker Walkthrough
7:41 Install AWS CLI
8:42 Laravel Deployment Prep
9:52 AWS RDS Create MySQL Database
14:52 Docker Base Images
18:23 AWS ECR Repository for Base Image
21:30 Create Build Trigger for AWS ECR using CodeBuild
25:05 AWS CodeBuild buildspec.yml
32:35 AWS CodeBuild IAM Policy
35:31 Prod Image
38:41 AWS ECS Cluster
39:24 AWS Task Definition
41:33 Running AWS Task Definition
46:02 AWS ECS Injecting .env Variables
49:36 What is AWS Load Balancer
50:06 What is AWS Target Group
50:22 Creating AWS Target Groups
51:09 Creating AWS Load Balancer
51:57 Configure AWS ECS to use Load Balancer
54:36 Purchase Domain using AWS Route53
55:13 Setting Domain with AWS Load Balancer
56:34 SSL Certificate using AWS Certificate Manager ACM
57:34 Enabling HTTPS
58:45 Redirect HTTP to HTTPs using AWS Load Balancer
Deploy Dockerized Laravel Application using AWS ECS with CodeBuild
Preparing Project for Prod
Create .env.prod file
Adjust .env.prod
Create Base Image
When you start running docker builds in your pipelines, you may end up pulling Docker Images from Docker Hub many times. Allot of people might not know this, but as of November 20, 2020, rate limits went into affect. This means that each IP is limited to 100 container image pulls for anonymous users and 200 for authenticated free users per 6 hours.
"If you exceed this limit, you won"t be able to pull images hosted on Docker Hub. Instead, you will get this error:
You have reached your pull rate limit. You may increase the
                  limit by authenticating and upgrading:
                  https://www.docker.com/increase-rate-limits.
You must authenticate your pull requests.
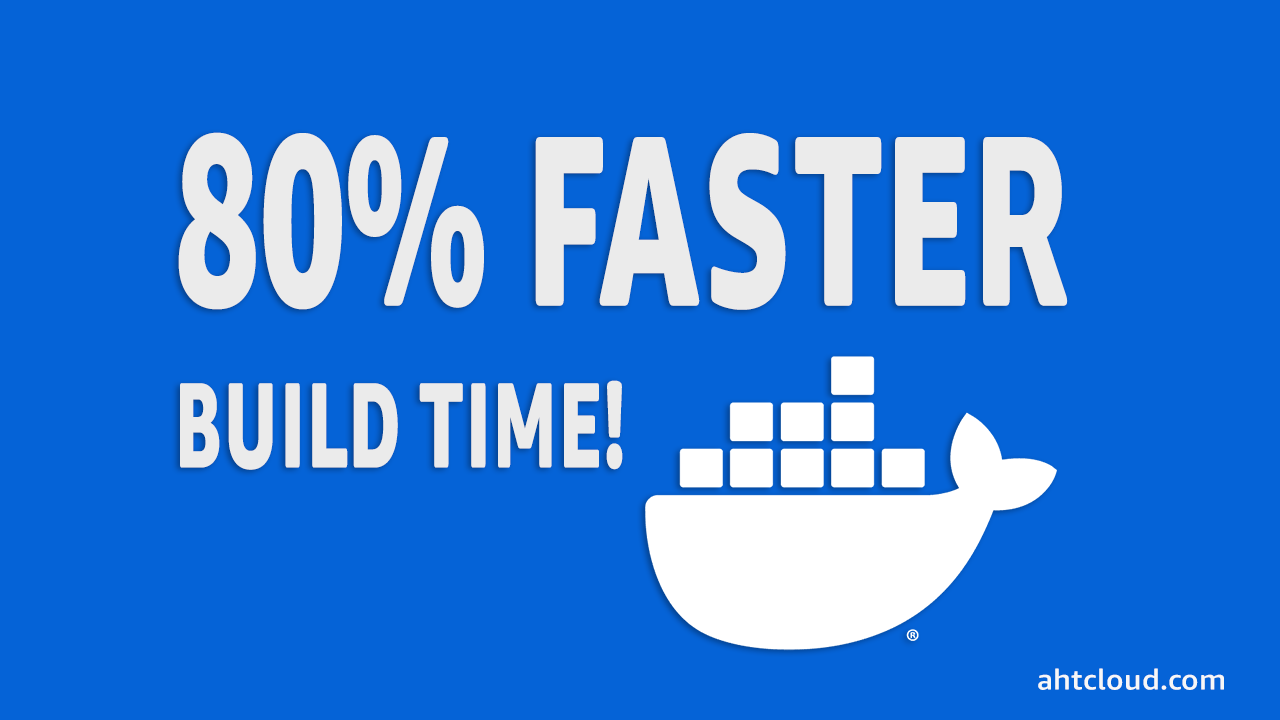
To solve this problem, we will need to create and host our own Docker Images instead of using images hosted in Docker hub. The good news is that, once you do this, you will reduce your docker images build time by at least 80%. Not just that its much faster, it also consumes allot less resources and build hours which saves you allot of money.
To create a base image, lets go ahead and copy our Dockerfile and Makefile inside our "laravel-api" projec and add it to our "laravel-api-base-image" project.
Now, were going to edit our Dockerfile, and remove everything that"s not related to installations.
# Used for prod build.
FROM php:8.1-fpm as php
# Set environment variables
ENV PHP_OPCACHE_ENABLE=1
ENV PHP_OPCACHE_ENABLE_CLI=0
ENV PHP_OPCACHE_VALIDATE_TIMESTAMPS=0
ENV PHP_OPCACHE_REVALIDATE_FREQ=0
# Install dependencies.
RUN apt-get update && apt-get install -y unzip libpq-dev libcurl4-gnutls-dev nginx libonig-dev
# Install PHP extensions.
RUN docker-php-ext-install mysqli pdo pdo_mysql bcmath curl opcache mbstring
# Copy composer executable.
COPY --from=composer:2.3.5 /usr/bin/composer /usr/bin/composer
Now, go ahead and build your image:
docker build -t prod-laravel-api-base-image .
Now, for our "laravel-api" project, instead of performing the installations that"s done inside our base image, were going to remove those and reference our base image instead of pulling php:8.1-fpm.
Change
FROM php:8.1-fpm as php
to
FROM larval-api-base-image as php
Create Database in AWS Relational Database Service (RDS)
Go to AWS RDS https://us-east-1.console.aws.amazon.com/rds
For our Database, we will using AWS RDS to create a relational database.
Create a new Database.
Set the following fields:
Database Creation Method:
Standard
Engine Options: MySQL
Templates: Free-tier
Settings:
DB Instance identifier: "prod-laravel-api"
Maser username to: "prod_laravel_api"
Check "Manage master credentials in AWS Secrets Manager"
Connectivity
Public Access: Yes
After the database instance is created, we will need to create a database table for our project." To connect to our RDS instance locally, we will need 4 pieces of information:
1. Hostname/IP " Go to AWS RDS, Databases, click on your database." Under Endpoint. Should look something like this: https://prod-laravel-api.c9v6rwseh86l.us-east-1.rds.amazonaws.com/
2. Port " Same as above.
3. Username - Go to AWS Secret Manager, Secrets, you should end an "rds" entry. Click on it, and then click "Retrieve secret value".
4. Password " Same as above.
Now, using your favourite database client, connect to your instance. If your instance times out, you will need to set a security group to grant your IP address access. Otherwise, once your connected, go ahead and create your database table. Let"s call ours "laravel_api".
If you have disabled public access for your RDS instance, you will need to launch an EC2 service, install MySQL and connect to your database using your EC2 instance.
Our final step, is to modify our .env.prod file. Adjust the following values. Note, make sure to use your RDS Instance Endpoint for HOST.
DB_CONNECTION=mysql
DB_HOST=prod-laravel-api.c9v6rwseh86l.us-east-1.rds.amazonaws.com
DB_PORT=3306
DB_DATABASE=laravel_api
DB_USERNAME=prod_laravel_api
DB_PASSWORD=
Storing Base Image in AWS ECR
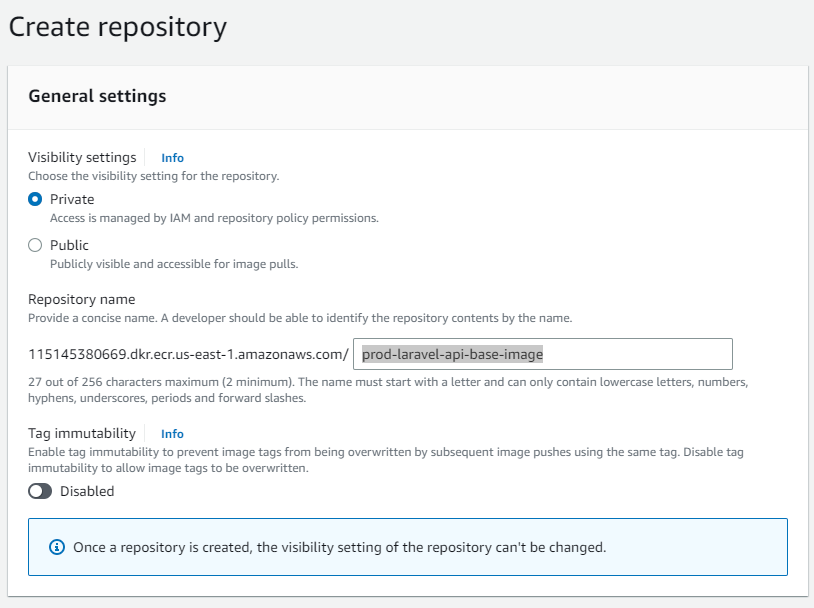
To store our docker images in AWS, we will need to create a new Elastic Container Repository.
Search and go to AWS ECR
Go to Repositories and click Create Repository.
For the visibility settings, set it too private. Otherwise with public, you will need to need be authenticated to pull your images. Unless you"re working on an open-source project, keep it private.
Base Image Build Trigger (AWS CodeBuild)
AWS CodeBuild will allow us to create a build trigger for our AWS ECR Repository.
The Trigger will pull our latest project files from GitHub (laravel-api-base-image), then build our docker image in a click of a button or automatically once any code is merged on your main branch.
In AWS Console, search and go to CodeBuild.
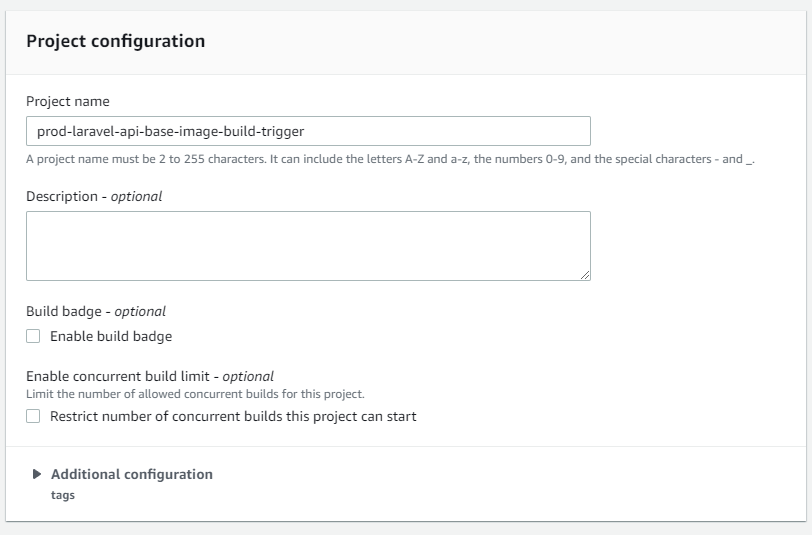
On the left side navbar, under Build, click on Build Project, then click on Create build project.
For the project name, name it prod-laravel-api-base-image-build-trigger
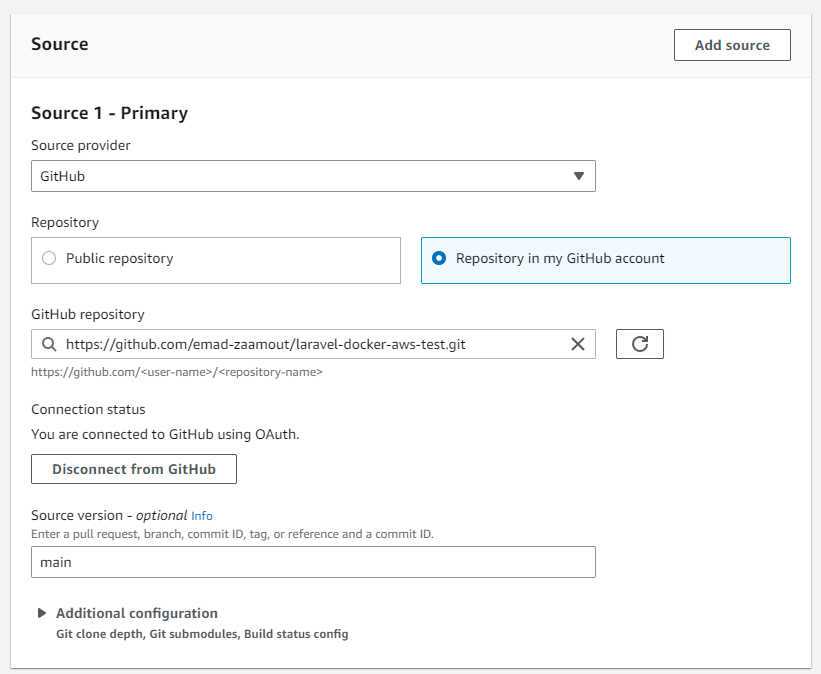
For the source, select GitHub. For the Repository option, select "Repository in my GitHub account".
Before selecting the GitHub repository, make sure you connect your GitHub by clicking on Connect GitHub account button under Connection Status. Once connected, you should be able to search for your repository.
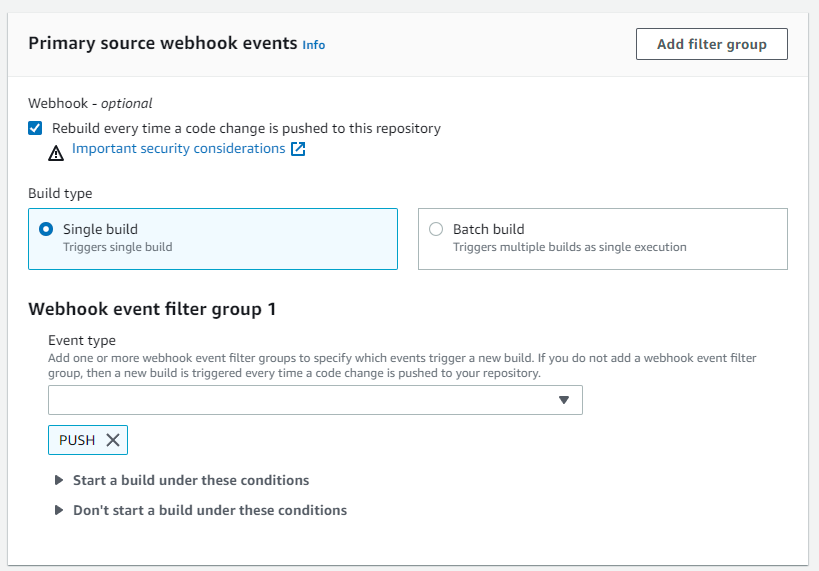
This part is optional, but if you want to automatically have CodeBuild build your docker image everytime code is merged to your main branch in github, then for the Primary source webhook events, check the Rebuild every time a code change is pushed to this repository option.
Select the Single build option and add the PUSH event.
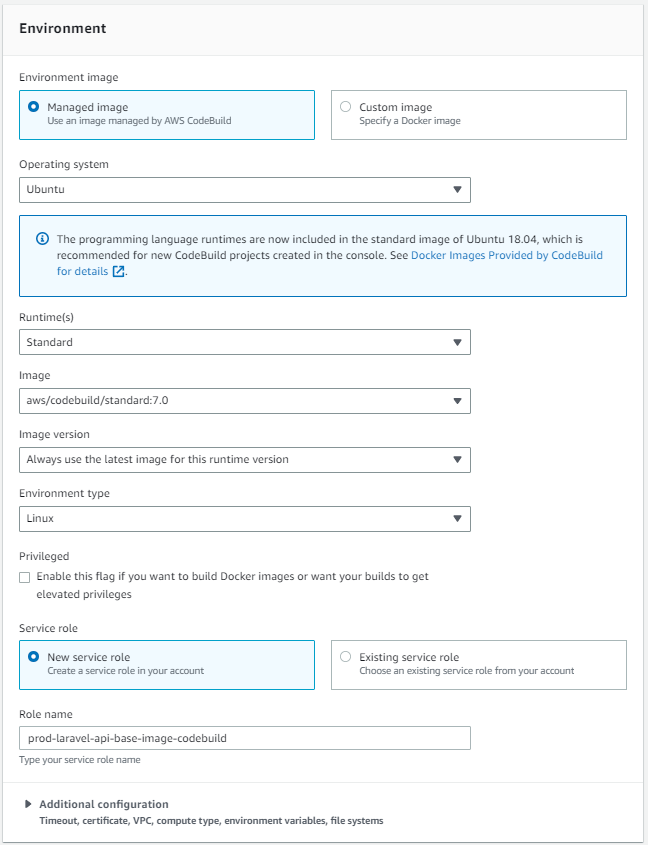
For the environment, select Ubuntu operating system. Set runtimes to standard and image to code build standard 7. Last, add a role name "prod-laravel-api-base-image-codebuild"
Scroll down, and click Create.
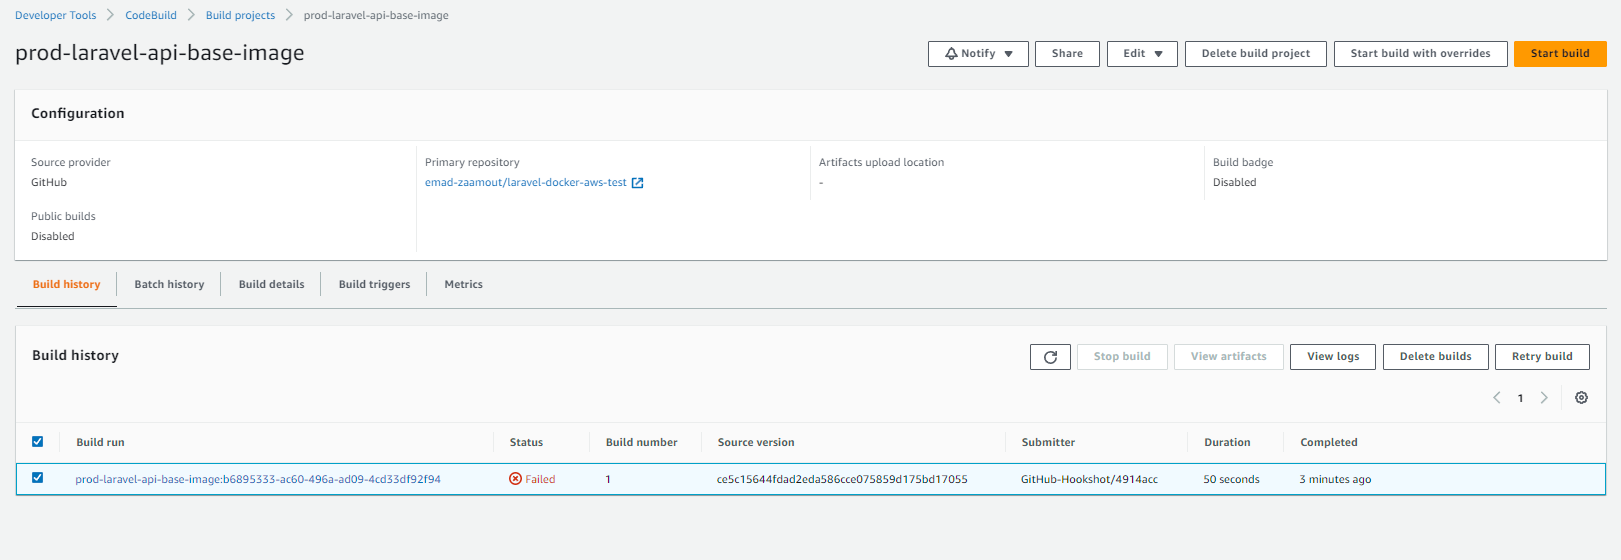
Once it done, we will need to add a "buildspec.yml" file to add our build instructions. For now, lets just test the workflow. Locally, make a change and push it to your main branch. Inside your AWS build trigger, you should see the trigger automatically trigger. The trigger should fail for now.
Add buildspec.yml for Base Image
The buildspec.yml file, is going to be ran by code build, once our trigger is triggered.
Create a buildspec.yml file inside your "laravel-api-base-image" project.
version: 0.2
phases: # https://docs.aws.amazon.com/codebuild/latest/userguide/build-spec-ref.html
install:
on-failure: ABORT # ABORT | CONTINUE
runtime-versions: # https://docs.aws.amazon.com/codebuild/latest/userguide/runtime-versions.html
php: 8.2
pre_build: # commands to be run before build
on-failure: ABORT # ABORT | CONTINUE
commands:
- aws --version
- echo Logging in to Amazon ECR....
- aws ecr get-login-password --region us-east-1 | docker login --username AWS --password-stdin $REPOSITORY
finally:
- echo pre_build done
build:
on-failure: ABORT # ABORT | CONTINUE
commands:
- cp .env.example .env
- docker build -t $IMAGE .
- docker tag $IMAGE:$IMAGE_TAG $REPOSITORY/$IMAGE:$IMAGE_TAG
finally:
- echo build done
post_build:
on-failure: ABORT # ABORT | CONTINUE
commands:
- echo after build
finally:
- echo post build done
- echo Pushing the Docker image...
- docker image ls -a
- docker push $REPOSITORY/$IMAGE:$IMAGE_TAG
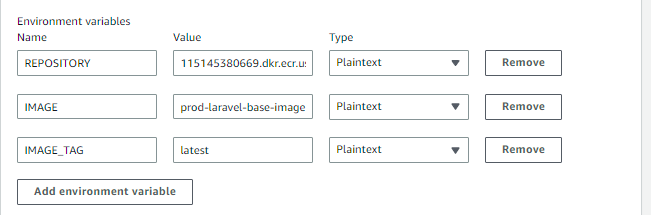
Notice that in our file, I am using few environments variables REPOSITORY, IMAGE and IMAGE_TAG
The repository variable contains our AWS ECR Image URL for "prod-laravel-api-base-image".
The Image variable represents what we will name our image too, and the IMAGE_TAG is the version.
To add these values, go to AWS ECR, Build Project and find "prod-laravel-api-base-image".
Select it, and click Edit, and select Environment.
Expand the Additional Configuration, scroll down and add 3 environment variables as follows:
To test our changes, push your code to main. If you already have, then inside your AWS CodeBuild, Build Project, click on Start Build.
Inside our buildspec.yml file, we are pushing our built docker image there. Since we have not configured our codebuild role to access our ECR repository, you should see a permission denied error.
Create ECR access IAM Policy for CodeBuild for Base Image
To grant our CodeBuild user, access to ECR, in your AWS Console, search and go to IAM
On the side nav under Access Management, click on Roles. Search for prod-laravel-api-base-image-codebuild.
Click on our role, then click "Add permissions", select attach policies.
Search for AmazonEC2ContainerRegistryPowerUser and add it.
Now, go ahead and retrigger the build trigger. Go to CodeBuild, click on "prod-laravel-api-base-image" and click Start Build.
Deployment Image Elastic Container Registry Repository (AWS ECR)
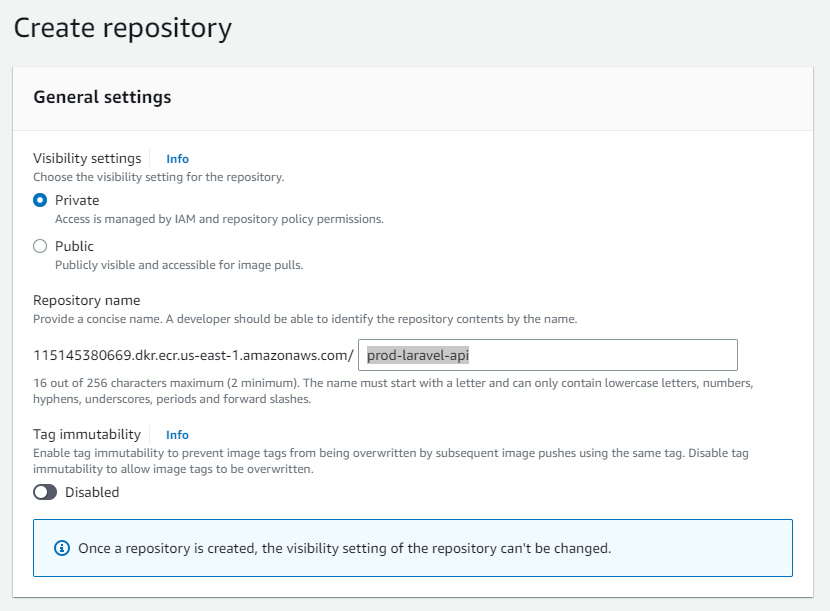
Let"s go back to AWS ECR, and create another private repository, call it "prod-laravel-api-base-image".
In your AWS Console, go to AWC ECR and find your Repository. Copy your repository URI and update your local your "laravel-api" project, to use the newly created base image.
FROM 115145380669.dkr.ecr.us-east-1.amazonaws.com/prod-laravel-api-base-image:latest as php
Deployment Image Build Trigger (AWS CodeBuild)
Create ECR access IAM Policy for CodeBuild for Deployment Image
Create Amazon ECS Cluster
To run our Dockerized application on AWS, we need to create an ECS Cluster. A cluster is basically a group of services. For example, in your docker build, if you"re running more then 1 container, then each container would be its own service."
Create AWS ECS Task Definition
Now that we have a cluster, we will need to create a task definition to run our application either as a task or a service.
"Task Definition" is a blueprint or configuration file that defines how a container should run within the ECS environment. This includes information such as:
- Port Mapping
- Environment Variables
- Docker Configuration
- Resource Limits
Once you have created your Task Definition, then we can run our application as a task or service.
A Task is created when you run a task definition directly, which launches your containers until they are stopped, or exit on their own, at which point they are not replaced automatically. So, its ideal to run your application as a Task for short-lived jobs, such as crons, or scripts. Its important to point out that a Task cannot be configured to use a load balancer.
A Service is like a Task, but it is used to guarantee that you always have 1 or more instances running. If your container exists due to an error, the ECS Service will automatically replace the failed Task. Additionally, a service can be configured to use a load balancer. A Service is best suited for public facing applications such as websites or API"s.
Running AWS ECS Task Definition
AWS ECS Inject ENV Variables from AWS Secret Manager
"secrets": [
{
"name": "test_secret",
"valueFrom": "arn:aws:secretsmanager:<region>:<acc-id>:secret:<some-secret-id>:<key-of-secret>::"
}
]
What is AWS Load Balancer?
In AWS, a Load Balancer allows you to control and redirect network traffic across various resources. In our case, we will use a Load Balancer to create a unique DNS name, and route both HTTP and HTTPS traffic to our application. Then, we will set up an SSL certificate to enable HTTPS and configure our Domain to redirect traffic to our Load Balancer.
What is AWS Target Groups?
A Target group is basically the configuration that defines where you want to direct traffic too. The load balancer will redirect traffic to your target groups.
Create Target Group " For Load Balancer
Go to AWS EC2
In the side navigation, scroll down, under Load Balancers click on Target Groups, then click Create Target Group. Set the following values:
Target Type: IP Addresses
Target Group Name: prod-laravel-api-http
Protocol: HTTP
Port: 80
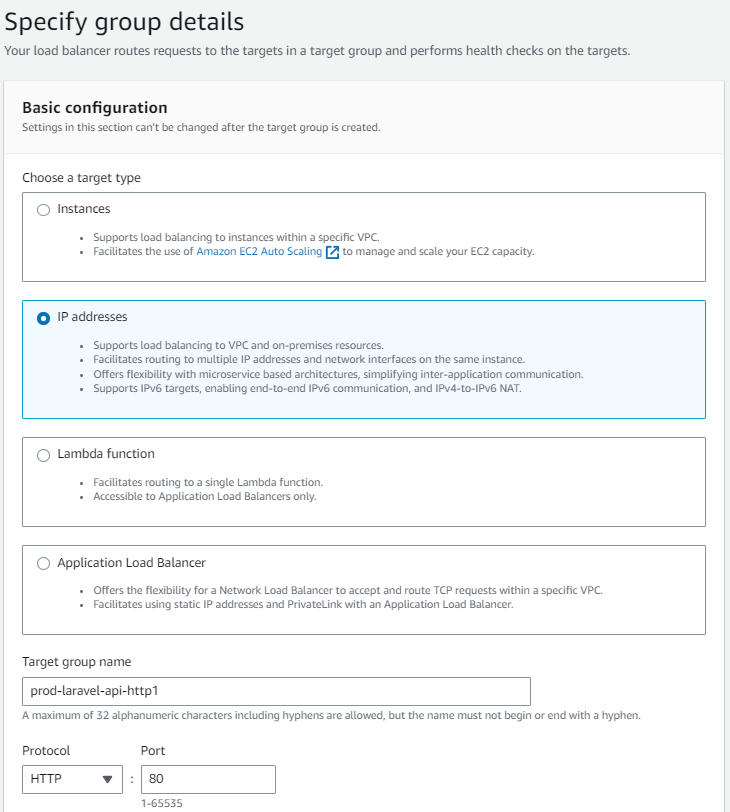
Click next. For the next section, you will want to set the Port inside Ports as the exposed port in your docker application. For our case, its port 8080. For the ip address, by default you should see a prefilled IP address. You will want to add the last value. For example, (172.31.0.) would become (172.31.0.34)
Click include as pending below, then create target group.
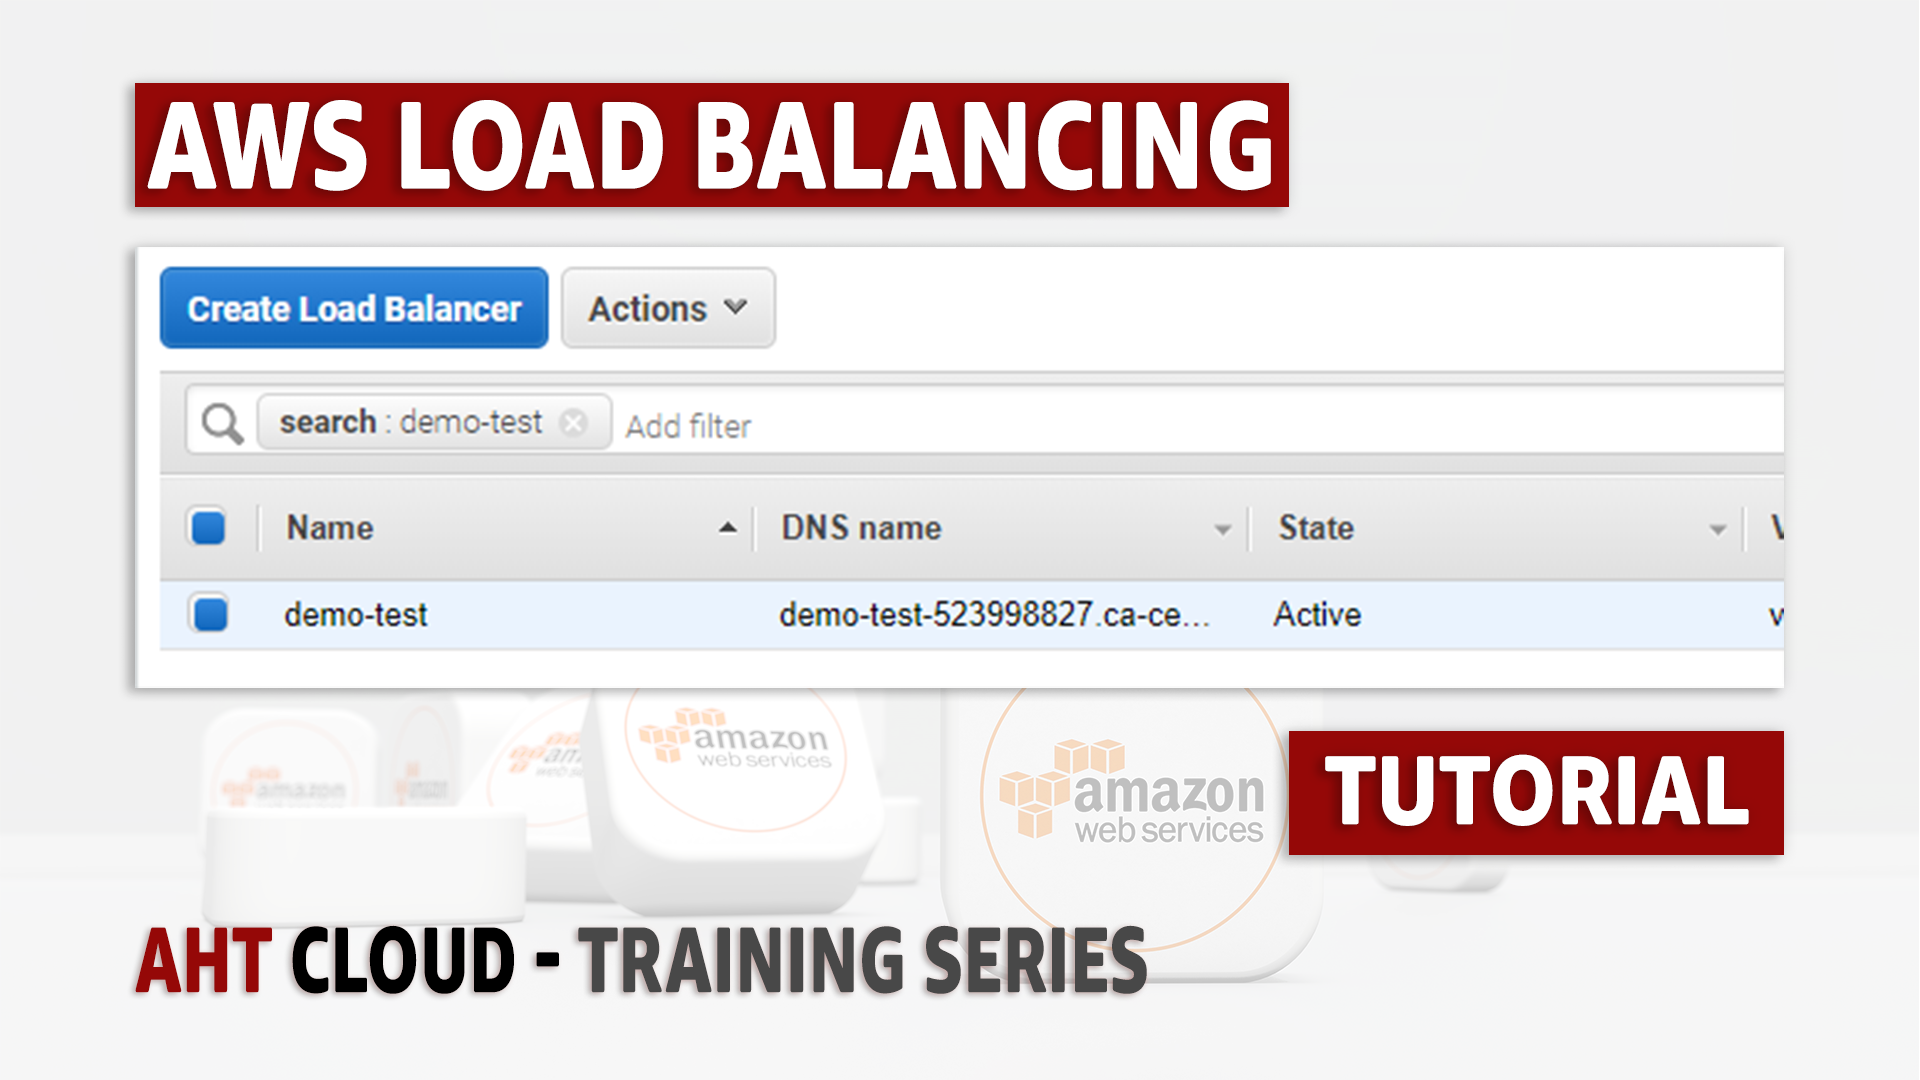
Create Application Load Balancer
Go to AWS EC2, In the side navigation, scroll down, under Load Balancers click on Load Balancers, then Create Load Balancer.
Click create Application Load Balancer, then set the following:
Load balancer name: laravel-prod-api
Scheme: Internet-facing
IP Address type: IPv4
Network Mapping (Select 2 zones)
Listener, HTTP 80, select our target group
prod-laravel-api-http
Click create load balancer. Once your Load Balancer build is complete, click on your load balancer and find your DNS name
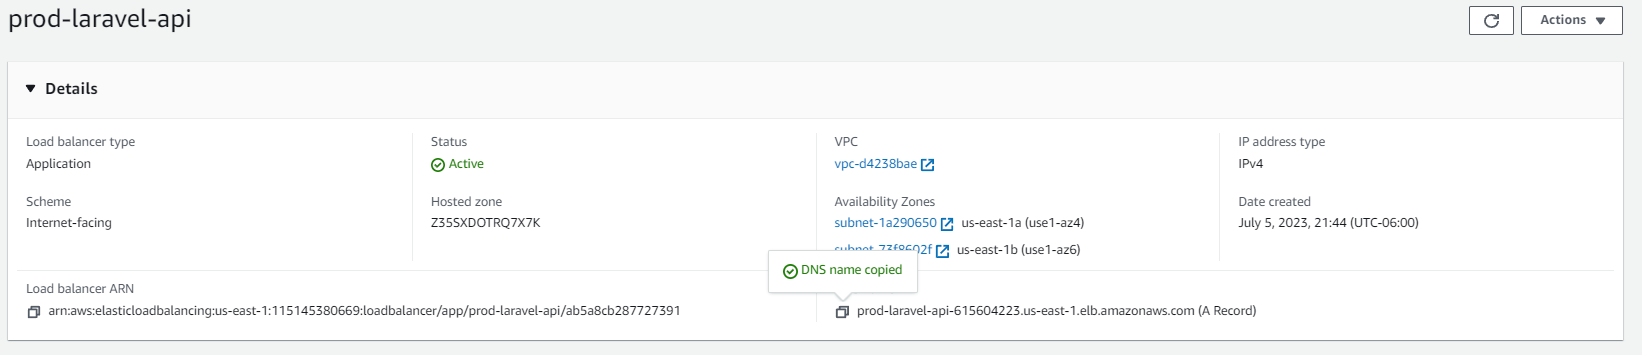
From this moment, we will only use the DNS name provided in our Load Balancer to access our service. In the last chapters of this course we will configure our DNS name to use our Load Balancer DNS. For now, try to open that URL in your browser. It shouldn"t work yet, as we have to reconfigure our ECS instance to use our load balancer.
Reconfigure ECS Instance to use Load Balancer
Now unfortunately guys, you cannot reconfigure your application instance to use a Load Balancer. Were going to have to delete our old application and redeploy our task definition using our Load Balancer.
Go to AWS ECS, Clusters, and click on our cluster. Select the Checkbox for our prod-laravel-api service, and then click update. Set the Desired tasks to 0. Then save. Last, inside your cluster, select the "prod-laravel-api" service again and delete it.
Now, go to Task definitions, click on our "prod-laravel-api" task definition, select the latest version then click Deploy, then Create new Service.
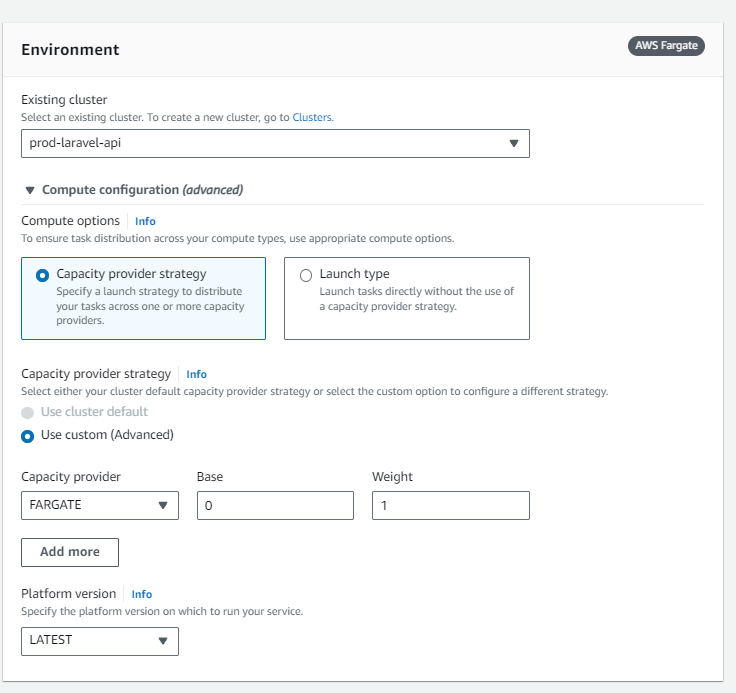
Select our cluster, then scroll down, under Deployment Configuration, set the service name to "laravel-api-prod". For the desired tasks, keep it 1.
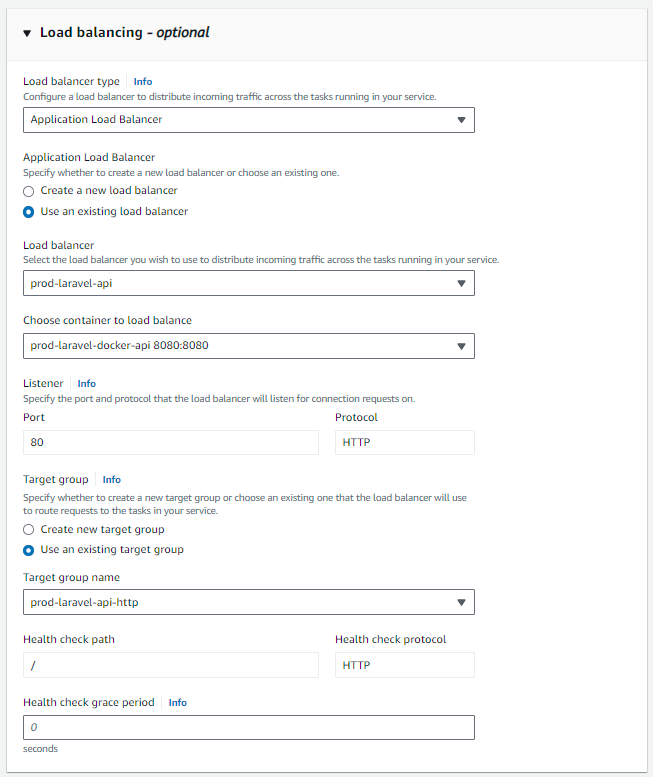
Scroll down, to the load balancer option, and select application Load Balancer. Select Use an existing Load balancer, then select our load balancer. For the Listener, select "use an existing listener" and select the 80:HTTP option. Then for the "choose container to load balance", select the "prod-laravel-docker-api 8080:8080 option. The final result should look like this:
Purchase Domain (Needed for SSL Certificate)
To purchase a domain, go to AWS Route53.
On the left side bar, Under Domains, click on "Registered Domains" and click Register Domain. Search for a domain and follow the steps. Once you purchase a domain, it should take less than 1 hour to fully load in your dashboard.
Setup Domain with Load Balancer
Once your domain purchase is complete and your domain is ready to use, go back to AWS Route53, and click on hosted zone. You should see a hosted zone created for your domain. Click on it.
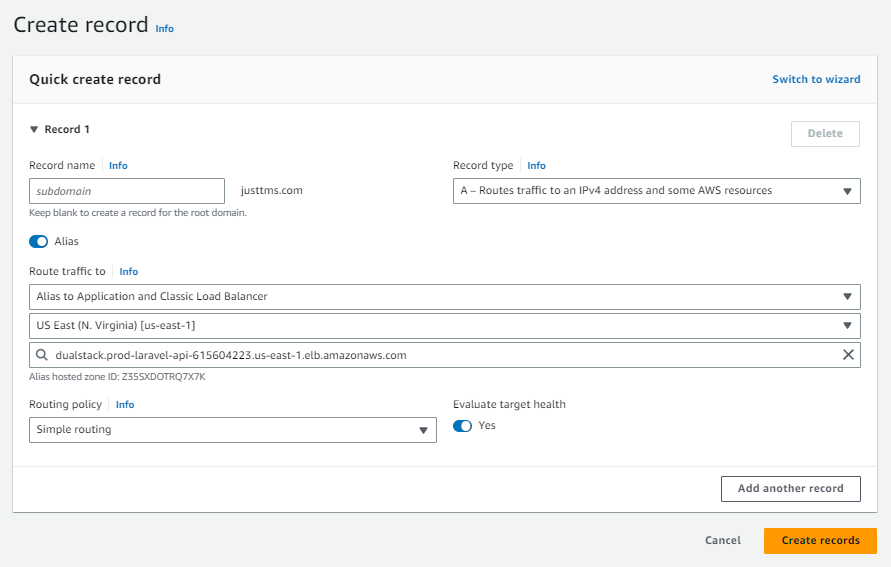
Were going to map our domain name justtms.com to our load balancer, and www.justtms.com to be an alias for justtms.com.
Create a new record.
For the Record Type, select "A " Routes traffic to an IPv4
Address
Then click on Alias.
For the Endpoint, select the "Alias to Application and Classic Load Balancer"
option." Then select your current region, and last, select your Load Balancer.
Finally, select your load balancer.
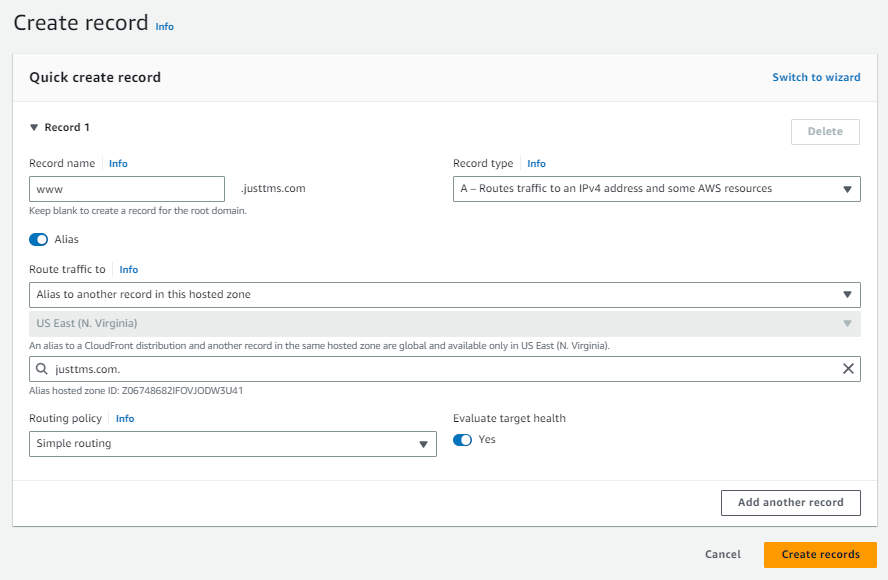
Click create. Now, create another record, to redirect www.justtms.com to justtms.
Like the last step, but instead of selecting the load balancer endpoint, choose the "Alias to another record in this hosted zone" option. Then select your domain. Also, for the record name, add www.
Result should look like this:
Note, it should take some time for your DNS to fully propagate. For me, it"s a around 30 minutes to 1 hour. But it could take up to 24 hours. This means that any changes you make to your DNS configuration, might not reflect in your browser so I would take a quick break.
AWS Certificate Manager (ACM)
To enable SSL, we need an SSL Certificate. Search and go to "Certificate Manager."
Under List Certificates, click Request.
For the fully qualified domain name, enter your domain name. Example justtms.com
For the Validation Method, select the DNS Validation method.
Click create.
Now, click on your certificate ID, in the middle section, you should see an option to "Create records in Route 53". This will automatically create a cname record with the name and value set as specified in the table below. If you bought your domain somewhere else, you would need to create a CNAME record inside your DNS with the information provided in the table.
Note, the verification might take some time, so I would check back in 10-15 minutes.
Reconfigure Load Balancer to Serve HTTPS
To enable HTTPS, we need to update our Load Balancer to use our new ACM SSL Certificate.
Go to AWS EC2 and let"s go back to our Load Balancer. Click to expand our load balancer, then click on Add Listener. For the protocol select HTTPS, configure for port 443. For the Listner setting, click to select our certificate.
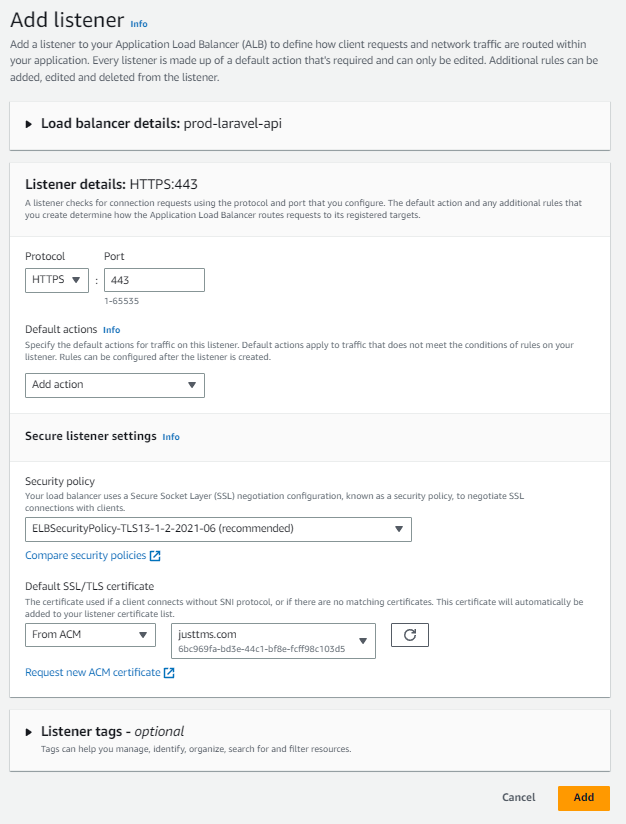
Click Add.
Redirect HTTP to HTTPS
Our last step is to redirect HTTP traffic to HTTPS using our Load Balancer.
Let"s go ahead an go to AWS EC2, then to Target Groups.
Select the HTTP:80 Target and click on actions then edit listener.
Click Remove, to remove the Forward to option. Then select "Redirect" for the action option. For the protocol, select HTTPS and port 443.
.

Wait around 10-15 minutes, then try to access your website via http://justtms.com
You should automatically be redirect to the https version.
The End
Thank you for watching. If you found this tutorial useful, give it a thump up. Making content like this guy, takes allot of time and effot. If you want to help me out, then consider sharing my videos and spreading the word.
I will be releasing another video you, how to create a CI/CD pipeline to automatically trigger deployments, and split traffic. Also, so forget to subscribe to my channel to stay up to date with my latest training series.
Other Posts


GET YOUR FREE ESTIMATE
CONTACT US TODAY FOR YOUR FREE CONSULTATION!
Contact us today to discuss your goals and we will create a simple roadmap to get you there. We look forward to speaking with you!
Main Office
Phone: 1 587-834-6567
Email: support@ahtcloud.com
32 Westwinds Crescent NE #130
Calgary, AB T3J 5L3, CA
Products
TMS
Cloud Based Transportation Management System
Hours Of Operation
| Monday | 8:00 am - 5:00 pm |
|---|---|
| Tuesday | 8:00 am - 5:00 pm |
| Wednesday | 8:00 am - 5:00 pm |
| Thursday | 8:00 am - 5:00 pm |
| Friday | 8:00 am - 5:00 pm |
| Saturday | Closed |
| Sunday | Closed |